Application for a Phytosanitary Certificate 2023
Application for a Phytosanitary Certificate
Version 2.0
Contents
2.5.1 +Add New Consignment Item
2.6.1 Special requirements for oranges to the EU market
3 Applying for Replacement ePhyto Certificate.
Purpose
This document provides step-by-step instructions on how to complete an application for a Phytosanitary Certificate on the eCert platform. An application for a Phytosanitary Certificate will be completed by users wanting to export agricultural products.
The eCert application can be accessed via the URL: https://app.ecert.co.za
Description of the tools available on the View application page:
Edit Application
View Application
View Phyto Application in PDF
Copy Application
Change to Submitted
Delete Application
Please note that you will have to change the status of the application to submitted so that the DALRRD inspectors can view the application and approve or reject it.
Register as a user.
https://app.ecert.co.za/Account/Register
Note: If you have already registered on the following platforms then there is no need to register again:
- eCert
- PhytClean
Applying for Phyto
Click on Apply
Figure 1: Apply (Phyto Application)
Agreement
- Use the dropdown arrow to select Application Type, Agreement, and Importing Country (Final Destination)
Figure 2: Agreement
Please note:
- To view the requirements of the Agreement, select the Agreement and click on the button to print (
) The Agreement to PDF.
- Search Tool (
) Can be used to search for specific information. It is included in each dropdown.
- Click Next to continue.
Please note: If you would like to save the application to complete at a later stage, you can click on the save button.
Documents
- Click on select files.
- Select the relevant files and add them. Then press Next.
Figure 3: Example of Document Types
Please Note:
- The Agreement selected will dictate what type of documents need to be uploaded and/or printed. These documents will be printed together with the Phytosanitary Certificate.
Flexi Fields
- This screen is used to capture flexible data that may be required for certain markets. Flexi field data captured will go into the additional declarations on the phytosanitary certificate.
- Press Next
Figure 4: Flexi Fields
Exchange Document
- Fill in the details of the consignor, consignee, transport, and payment information in the fields provided. Then press next.
Figure 5: Exchange Document
Please Note:
- If the CBR (Central Business Register) Owner Reference and Billing Reference is missing from the drop-down list and you are the owner of the company, then you will need to register your company on the CBR first. Refer to the Register New Business on CBR User Guide on how to do this.
- You will only see businesses on the dropdown that you are linked to in CBR.
Consignment Information
You can add consignment items by either using the +Add New Consignment Item tab or by Upload Excel File.
Figure 6: Consignment Info
+Add New Consignment Item
2.5.1.1 Click +Add New Consignment Item.
Figure 7: +Add New Consignment
- On the pop-up fill in the details for the consignment
- Click Update
Please note: To see the Packaging Section and Update you will have to scroll down.
Figure 8: Update Consignment
- Download & Upload Excel File
2.5.2.1 Click on Download Excel Template (Treatment or No Treatment)
This option will allow you to Import a bulk consignment. Please make sure that the data you are adding match what is on the system. You can use the View All Common Names option to make sure that commodities added on the spreadsheet match the ones on the system.
Figure 9: Down Excel Template (Treatment or No Treatment)
- To upload the template, click on Upload Excel File.
Figure 10: Upload Excel File
- Once the data is imported a success message will pop up. Click OK.
- Then click Next.
Figure 11: Prompt
- Once you happy with the consignment click Next
- You can update and delete consignment. Use the scrollbar to scroll to the right then you will see Edit and Delete options.
Additional Information
- Fill in the necessary details. Then click Next.
2.6.1 Special requirements for oranges to the EU market (Cold treatment)
- Temperature Regime is a require field.
- This field is populated with the temperature regime code that is allocated to the container being used.
- This field has a selectable drop-down list of temperature regime codes that the user can select from.
Figure 15 - Temperature Regime Code
Please Note:
- There will now be four new columns added to annexure 2 of the Phytosanitary Certificate.
- The new column, “Temperature Regime code,” will populate from what is selected on step 6.
- The new column, “container number” will populate from the trade units
- Stuff date and time entered on trade units will be used as “Cold treatment Start Date” and the calculation will determine “Cold Treatment End Date”
Add Trade Unit
- Add the trade unit by clicking on +Add Trade Unit
Figure 16 -Add Trade Unit
- A pop-up window will appear, please complete all the fields, and press Update.
Figure 17 - Update Trade Unit Information
View Trade Units
To view all properties of the Trade Units, on the grid, use the scrollbar (pointed out in Figure 16) and scroll to the right.
Figure 18 - View Trade Unit
Each line item that you would have had on the addendum per pallet (for fruit) would be captured as a trade unit. For example, if you have 20 pallets you will have 20 records in the grid above (Figure 19).
Edit Trade Unit
- Using the scrollbar, scroll to the right and click on Edit on the relevant Trade Unit that you want to modify.
- Change details.
- Click on Update
Figure 19 - Edit Trade Unit
Delete Trade Unit
- Using the scrollbar, scroll to the right and click on Delete on the relevant Trade Unit that you want to delete.
Figure 20 - Delete Trade Unit
- You will be prompted to confirm the deletion.
- Press OK to delete the Trade Unit or Cancel to stop the deletion from happening.
Figure 21 - Prompt
Upload Excel File
- An Upload Excel File option can be used to add the Trade Unit. This option will allow you to import Trade Unit information from an Excel file. To use this option, you can click Upload Excel File and select the excel spreadsheet from your files.
- A pop-up message will appear to notify you that trade unit records have been successfully imported. Click OK
Figure 23 - Import Successful Prompt
- Once all Trade Units have been captured, press Next
Figure 24 - Press Next
Please Note:
- Information captured on this panel is what goes on the addendum.
Phyto Display Details
- This section can be used to fill in information that you would like to appear on the Phyto. You are not required to complete it.
- To add information on this page you will need to tick the checkbox then add the information.
- Then Click Next
Figure 25: Phyto Display Details
Submit
- Click on the Submit button, otherwise click on Previous and make relevant corrections.
Figure 26: Submit.
- A pop-up message with the NPPO application number will appear to notify you that the application has been successfully submitted. Click OK.
Figure 27: Prompt
View Application
- Click on the Draft tab to view the application that you submit.
- Search option
can be used to search for an application. You can search by using the application reference number.
Figure 28: View Application
3 Applying for Replacement ePhyto Certificate.
- Click on Apply.
Figure 29-Apply.
Agreement
- Select Replacement Phyto Certificate under Application type drop down list.
Figure 30-Application Type
- Select Replacement under Agreement.
Figure 31-Agreement
- Type Replacement Phyto number in the box provided.
Figure 32-Replacement Phyto Number
- Click on Find Phyto
Figure 33-Find Phyto
Figure 34 - Application Retrieved
- Application retrieved box will appear.
- Select Replacement Reason from the drop-down list.
Figure 35-Replacement Reason
- Type in Replacement Comment if necessary.
Figure 36 - Replacement Comment
- Select Importing Country from the drop-down list.
Figure 37-Importing Country
Once completed you can click on Next.
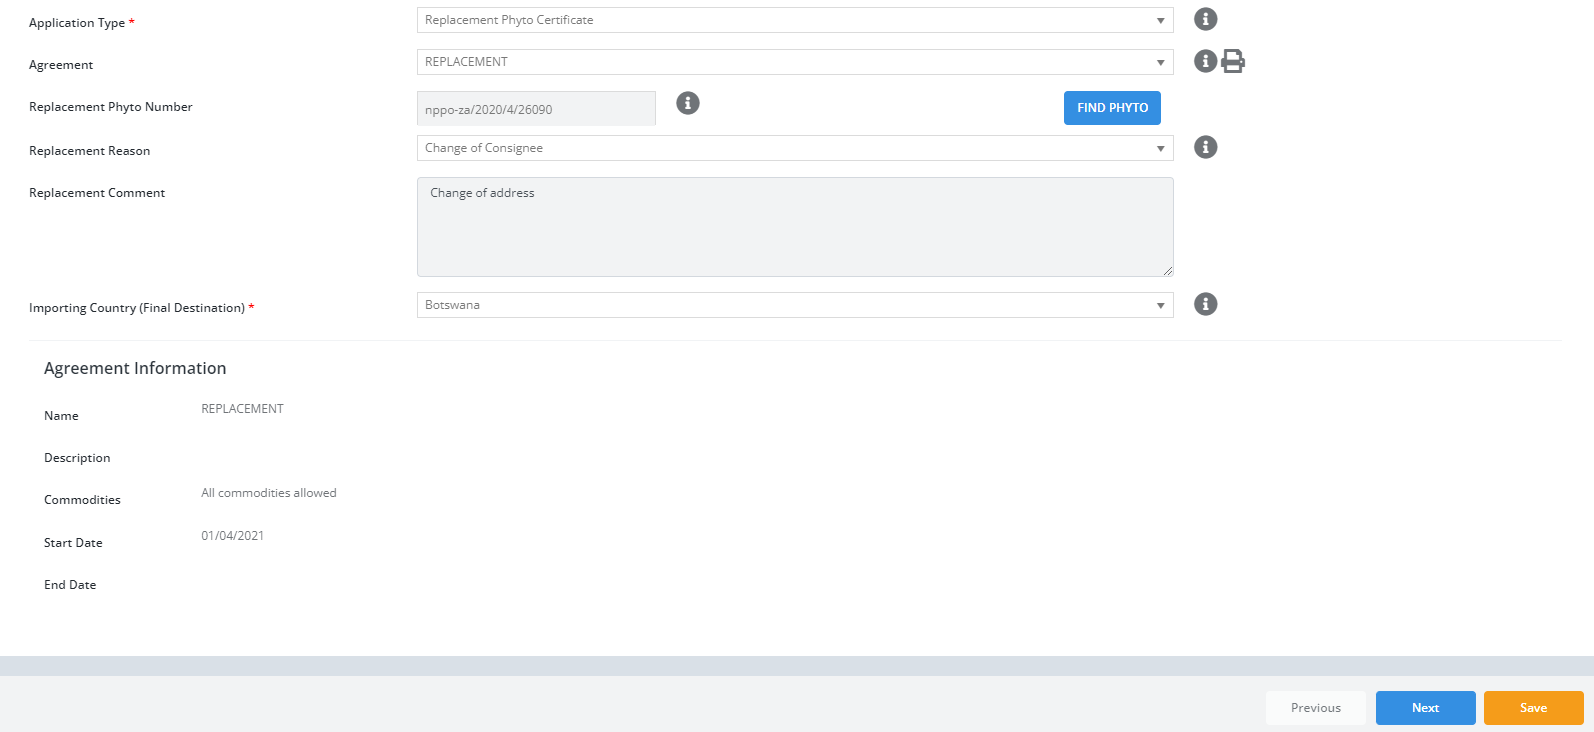
Figure 38-Next
Documents
- Click on Select Files
- Select relevant files and add them. Then press next.
Figure 39-Example of Documents
Please Note: A Certified copy of phytosanitary certificate document is required for Re-Export certificates.
Flexi Fields
- Type in Import Permit Number and Import Permit Date. Then Click Next
Figure 37 - Flexi Fields
Exchange Document
- Fill in details of the consignor, consignee, transport, and payment information in the fields provide. Then press Next.
Figure 40 - Exchange Document
Consignment Information
- You can add consignment items by either using the +Add New Consignment Item tab or by Upload Excel File.
Figure 41 - Consignment Info
- +Add New Consignment Item
- Click +Add New Consignment Item.
Figure 42 - Add New Consignment Item
- On the pop-up fill in the details for the consignment
- Click Update
Figure 43 - Consignment Page
- Click on Download Excel Template (Treatment or No Treatment)
Figure 45 - Excel Template
- To upload the template, click on Upload Excel File.
Figure 46 - Upload Excel File
- Once the data is imported a success message will pop up. Click OK.
- Then Click Next.
Additional Information
- Fill in necessary details. Then click Next.
Figure 47 - Additional Information
- Then click Next.
Phyto Display Details
- This section can be used to fill in information that you would like to appear on the Phyto. You are not required to complete it.
- To add information on this page you will need to tick the checkbox then add the information.
- Then click Next.
Figure 48 - Phyto Display Details
Submit
- Click on the Submit button, otherwise click on Previous and make relevant corrections.
Figure 49 - Submit.
- A pop-up message with the NPPO application number will appear to notify you that the application has been successfully submitted. Click OK.
Figure 50 - Prompt
View Application
- Click on the Draft tab to view the application that you submit.
- Search option
Figure 51 - View Application
4 Applying for Re-Export ePhyto Certificate.
- Click on Apply.
Figure 52 -Apply.
Agreement
- Select Phytosanitary Certificate for Re-Export under Application type drop down list.
Figure 53 - Application Type
- Select Re-Export under Agreement.
Figure 54 - Agreement
- Type Original Phyto number in the box provided.
Figure 55 - Original Phyto Number
- Select Original Phyto Date from the Date Picker.
Figure 56 - Date picker
- Select Place of Origin from the drop-down list.
Figure 57 - Place of Origin
- Select Type of Phyto Copy from the drop-down list.
Figure 58 - Type of Phyto Copy
- Select Packaging from the drop-down list.
Figure 59 - Packaging
- Select Container Condition from the drop-down list.
Figure 60 - Container Condition
- Tick Based on Original Phyto and Additional Inspection Tick boxes if Applicable.
Figure 61 - Tick Boxes
- Select Importing Country (Final Destination) from the drop-down list.
Figure 62 - Importing Country
- Once completed you can click on Next.
Figure 63 - Next
Documents
- Click on Select Files
- Select relevant files and add them. Then press next.
Figure 64 - Example of Documents
Please Note: A Certified copy of phytosanitary certificate document is required for Re-Export certificates.
Flexi Fields
- Type in Import Permit Number and Import Permit Date. Then Click Next
Figure 65 - Flexi Fields
Exchange Document
- Fill in details of the consignor, consignee, transport, and payment information in the fields provide. Then press Next.
Figure 66 - Exchange Document
Consignment Information
- You can add consignment items by either using the +Add New Consignment Item tab or by Upload Excel File.
Figure 67 - Consignment Info
- Click +Add New Consignment Item.
Figure 68 - +Add New Consignment Item
- On the pop-up fill in the details for the consignment
- Click Update
Figure 69 - Consignment Page
Download & Upload Excel File
- Click on Download Excel Template (Treatment or No Treatment)
Figure 71 - Excel Template
- To upload the template, click on Upload Excel File.
Figure 72 - Upload Excel File
- Once the data is imported a success message will pop up. Click OK.
- Then Click Next.
Additional Information
- Fill in necessary details. Then click Next.
Figure 73 - Additional Information
Phyto Display Details
- This section can be used to fill in information that you would like to appear on the Phyto. You are not required to complete it.
- To add information on this page you will need to tick the checkbox then add the information.
- Then click Next.
Figure 74 - Phyto Display Details
Submit
- Click on the Submit button, otherwise click on Previous and make relevant corrections.
- A pop-up message with the NPPO application number will appear to notify you that the application has been successfully submitted. Click OK.
Figure 76 – Prompt
View Application
- Click on the Draft tab to view the application that you submit.
- Search option
Figure 77 - View Application
Related Articles
eInspect Phytosanitary Inspection (Fruit & General Inspection) (End Users)
Please download the relevant guides by selecting on the Attachment TabImport Permit Application User Guide V1
Import Permit Application User Guide Version 1.0 Contents Version 1.0 Purpose 1. Register as a user 2. Logging in 3. Add New Permit As a General User 4. Rejecting or Accepting an Import Permit as a Plant Health Permit Clerk 5. Creating, updating, ...Import DAIRY User guide
Please find the DAIRY Import User Guide. For any queries contact our support team Email: support@ecert.co.za Phone: 031 940 6795 Support Portal: https://support.ecert.co.zaFinal list of PUCs/PHCs for export of Apples to Taiwan during 2023-24 season
Please find the below links containing the reports PUC : https://ecert.co.za/wp-content/uploads/2024/05/Final-list-of-PUCs-for-export-of-Apples-to-Taiwan-during-2023-24-season.xlsx PHC : ...Final China PUCs and PHCs Citrus database for 2024 export season
Please find the below link for Final China PUCs and PHCs Citrus database for 2024 export season. https://ecert.co.za/wp-content/uploads/2024/05/Final-China-PUCs-and-PHCs-Citrus-database-for-2024-export-season.xlsx